That dog will be well worth the surgery. Kinda partial to Macks as we have 3 R models and a CH. I see the engine is an E6. What HP?

Navigation
Install the app
How to install the app on iOS
Follow along with the video below to see how to install our site as a web app on your home screen.

Note: This feature currently requires accessing the site using the built-in Safari browser.
More options
You are using an out of date browser. It may not display this or other websites correctly.
You should upgrade or use an alternative browser.
You should upgrade or use an alternative browser.
Project "Gunsmoke"
- Thread starter licensed to kill
- Start date
1981, 2 valve E6-350 with twin stick 6 Spd.
John in Oz
Well-Known Member
Very nice, neat to see you saving that banger. My ex boss has one and he bought it thinking it was restored, oh well he likes it but a blind man at 40 paces could see it is rough as guts and bog ( Bondo ) all over the body work and not sanded very well, mind you he does have a fleet of about 90 + Mack's and still haunts me to go back and drive for him. So this to me is refreshing to see a job done well.
I appreciate all the kind words. Helps a guy to stay motivated. My GOAL is for nothing more than high build primer so ZERO bondo. Not saying that that is how things will turn out, just that this is my goal. If I DO have to resort to some filler it will be certainly kept <1/16".Very nice, neat to see you saving that banger. My ex boss has one and he bought it thinking it was restored, oh well he likes it but a blind man at 40 paces could see it is rough as guts and bog ( Bondo ) all over the body work and not sanded very well, mind you he does have a fleet of about 90 + Mack's and still haunts me to go back and drive for him. So this to me is refreshing to see a job done well.
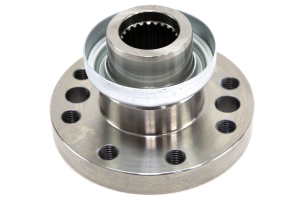
Its been awhile since I did an update. I have been working on the truck but a LOT of waiting on parts and the like has slowed progress. My original plan was to go with the stock Dayton (spoke) wheels with the Mack hub caps, however, it was pretty much impossible to convert the rear axle from Budd wheels to Daytons so I went the other way. After doing a fair bit of investigating options, I found that swapping out the front axle was a no-go because the B61 frame is 2" narrower than newer trucks, swapping out the spindles was a no-go as there were no other spindles that would fit my axle and, while I COULD have sourced some Budd hubs from a B-61 (they WERE available), those would be stud pilot and I wanted hub pilot. SO, I scored a set of hubs from a newer truck and modified them to fit my axles. Unfortunately, I had to hire out a few of the operations which made the conversion quite expensive but a guy's gotta do what a guy's gotta do. I started by taking the hubs to a machine shop and having the shoulders for the bearing races machined out as well as an index shoulder machined in for the outer bearing. I used the seal shoulder for the index for the inner sleeve.

I then machined interference fit inserts with an internal measurements that copied the original Dayton hubs to fit the hub so that the "new" hubs will accept the stock bearings to fit the spindle and pressed them into place.

The stock drums were 16" ID and the newer style are 16.5" ID so I had to have the shoes relined with thicker lining to make up the difference. I could not find suitable lining on line anywhere so I had to take the shoes to Edmonton clutch an brake to have them relined. It was costly but I told them that the shoes had to fit a 16.5 ID brake drum and they fitted the appropriate lining for that application.

Once I had the hub installed, I took the measurement for the death of the brake drum that I need and found that there are no drums available that would fit perfect. The closest I could find was 9.75" deep and I wanted 10". They would have worked but the inside edge of the drum would have been right on the inside edge of the shoe and I wanted it to be "right" (just shy of the backing plate) so I bought common drums (which are 10.5" deep and, again, had to take them to the machine shop to have them shortened to exactly what I wanted (My lathe was WAY to small to accommodate a drum).

And voila, hub pilot budds to match the drive axle. Pretty simple operation but quite costly to have most of then operation hired out. At least I was able to make the adaptor inserts myself. Chassis is pretty much done so moving on to body work next.

I then machined interference fit inserts with an internal measurements that copied the original Dayton hubs to fit the hub so that the "new" hubs will accept the stock bearings to fit the spindle and pressed them into place.
The stock drums were 16" ID and the newer style are 16.5" ID so I had to have the shoes relined with thicker lining to make up the difference. I could not find suitable lining on line anywhere so I had to take the shoes to Edmonton clutch an brake to have them relined. It was costly but I told them that the shoes had to fit a 16.5 ID brake drum and they fitted the appropriate lining for that application.
Once I had the hub installed, I took the measurement for the death of the brake drum that I need and found that there are no drums available that would fit perfect. The closest I could find was 9.75" deep and I wanted 10". They would have worked but the inside edge of the drum would have been right on the inside edge of the shoe and I wanted it to be "right" (just shy of the backing plate) so I bought common drums (which are 10.5" deep and, again, had to take them to the machine shop to have them shortened to exactly what I wanted (My lathe was WAY to small to accommodate a drum).
And voila, hub pilot budds to match the drive axle. Pretty simple operation but quite costly to have most of then operation hired out. At least I was able to make the adaptor inserts myself. Chassis is pretty much done so moving on to body work next.
Last edited:
John in Oz
Well-Known Member
Very nice, man alive you sure are getting stuck into that truck, nice to see
Starting to get back to the Mack. My left hand still doesn't work very well and is a source of constent grief and frustration but I can't wait forever. I will just swear a lot (not like that would be a new development). I see that I did not post how things left off a year ago April but, to put the project aside for the summer I set the cab back on the chassis (to save shop space). Thought I would put the cab bolts through just to get a look at everything in place and wouldn't you know, the holes in the cab would not line up with the holes in the mounts. WTF????. The cab would not come forward enough without running into the motor. Took the throttle linkage off (it is mounted across the back of the engine) which gave me more room but still no go. NOT IMPRESSED. The engine I used is the same basic block as the original ( and is a relatively common swap) and I used the original front mount but had to make the rear mounts because the mount location on the trans was a bit different than the original trans. Went and looked at the other chassis that has the original engine still in it and noticed that the engine mount, which looks like a big pillow block, on that chassis was pushed all the way to the front cover whereas on "gunsmoke" it was about 1" away from the cover. The engine could not be moved any more forward on the mount or the balancer would hit the rad support. I went on a Mack forum that I follow and asked if anyone there knew "what's up with that" (as I know there are a few guys there that have done this exact swap), and was promptly asked if I had used the balancer and water pump from the original engine. UH, "no"!. Well that is the problem, the balancer shaft and water pump shaft are shorter on the original engine than the one I used. DOH!!!!. Soooooo yesterday I had time so I lifted the motor, removed the balancer and pushed the mount as far as its can go (back to the front cover) installed the balancer from the original engine and moved the engine/trans forward and reinstalled the front mount bolts. Of course this means that I have to make all new rear mounts again, make some mods to the clutch linkage (which will require the removal of the trans) and that there is 1" less contact inside the slip yoke on the driveshaft. Pretty sure I will find some more things that will require a redo. THIS TIME, before remaking the rear mounts I will set the cab back on and MAKE SURE everything is as it should be. Unfortunately, experience is something you get right after you needed it.I have a similar problem with the cab itself but will get into that later on when I start to fix THAT FU.
If the slip yoke insertion is an issue, yau may be able to make a spacer ring to sandwich into the companion flange. Probably have to custom make longer body fitted bolts. Hayes and probably Pacific used to use body fitted frame bolts in various lengths, but finding them nowdays is likely not an option. They were made by Walter Sakoloff in North Vancouver.
Awesome, Mack Update! I was wondering about this build, after you were asking about the sound deadener.
Sorry to hear the issues with the hand…and that it is slowing you down; sure hope that heals closer to perfection.
Sorry to hear the issues with the hand…and that it is slowing you down; sure hope that heals closer to perfection.
Actually, I was asking about the sound deadener for my sprayers but I will also be wanting some for the Mack as well. I really doubt that the hand will ever be "useful" again. When it got injured, the surgeon said 1 1/2 years for full recovery and it has been less than a year to date (Oct 15th will be one year). However, it has not progressed for quite awhile now and, in fact, seems to be worse in some respects. Whatever, it is what it isAwesome, Mack Update! I was wondering about this build, after you were asking about the sound deadener.
Sorry to hear the issues with the hand…and that it is slowing you down; sure hope that heals closer to perfection.
I am not sure I follow what you are suggesting as I don't know what is meant by "companion flange" or even "body fitted bolts" for than matter. While I have yet to go out and look at the driveshaft to see what you may be referring to, those terms are foreign to me.If the slip yoke insertion is an issue, yau may be able to make a spacer ring to sandwich into the companion flange. Probably have to custom make longer body fitted bolts. Hayes and probably Pacific used to use body fitted frame bolts in various lengths, but finding them nowdays is likely not an option. They were made by Walter Sakoloff in North Vancouver.
Often there's a companion flange and flange yoke somewhere in your drive line to facilitate easy disassembly. The bolts used to connect these should have the unthreaded shank of precision diameter and length for a very close fit in the hole. These bolts are usually made on a lathe rather than common forgings with rolled threads as used for normal bolts. These precision bolts act as dowels to prevent any rotational movement between the two parts.
In the case of Hayes trucks, we would have all the frame rail and crossmember and other bracket holes pre drilled undersize. then on assembly we would use "bridge reamers" through all pieces at once to open the holes up to size. Then we had the bolts made 2 to 3 thou oversize and would drive them in for a press fit. This was done to produce a rivetid like construction that could be taken apart more easily than with rivets. Some other truck makes may also have done this, but no longer.

In the case of Hayes trucks, we would have all the frame rail and crossmember and other bracket holes pre drilled undersize. then on assembly we would use "bridge reamers" through all pieces at once to open the holes up to size. Then we had the bolts made 2 to 3 thou oversize and would drive them in for a press fit. This was done to produce a rivetid like construction that could be taken apart more easily than with rivets. Some other truck makes may also have done this, but no longer.
Starting back on this project so here is an update on the latest developments. Might want to pour a coffee if you plan to read on. So, two years ago, when I first started this thread "Hunter" sent me the contact for a friend of his in Kamloops that used to own a Mack dealership and is, himself restoring a B-61. I had contacted "John" about parts a few times before my injury but, this, fall we were going to Penticton to visit my mother so I contacted John again to see if he would be around and if I could stop and see what he may have for parts that I need. During the conversation I casually asked "you wouldn't happen too have a decent cab kicking around", John said "yes I do. it has had the body work done and is in primer with the interior already painted. I don't know how much bondo is in it though". I said "how much do you want for it?", He said $500". I said "well I guess I will be bringing a trailer then". So we get there and I poke through his parts and identify several that I could use, the cab is still under a tarp but John said he will untarp it when I get back. I leave my railer there and go to Penticton for a few days. Stopping in on the way back, john "unveils" the cab. It needs work but no where NEAR the work my current cab needs and for $500, on the trailer it goes. I also picked up a drivers side fender, grill shell (both need work but are a LOT better than what I have) and a few others small parts. Then John said to me "I was thinking about what you said regarding your project and what you have won't work". I said "HUH?". He said, "you said you have an E-6 350 and a twin stick 6spd, that won't work unless you only plan to bobtail around". I said "What you talking' about Willis???". He said, That trans is a "Maxitorque" and is designed to go behind a Maxidyne engine, the E6 350 is an Econodyne engine, different torque curve and completely unsuitable for a 6spd. It will not perform without more gears and you will NOT be happy with it". I said "well the engine and trans came out of the same truck", John said "well Mack didn't put them there, that trans must have been changed at some point" I said, Actually, the guy said that the ENGINE had been changed and was not original to the truck". John says "yup". Well, aint THAT special!!!. All the way home I'm stewing about the time and money I have into making that trans work and now I have to replace it. NOT impressed. I HAVE a duplex and a triplex at home but the reason I didn't use one of those in the first place was that they were made for 180HP engines and are not strong enough for a 350. I called John and asked his opinion on using one of those and he said he would not recommend the duplex (5X2) but the triplex (5X3) would work well. I asked about the strength issue and he said for what I am doing it would be just fine. So I get home and fetch the triplex out of the junk pile to check it out. The reason it was there was that when I got the truck, one of the PTO covers was missing and the trans had a mouse nest in it so I assumed it would be junk. Brought it in the shop and pulled the top covers off and, other than some goo in the bottom of the case, everything looks very good, clean, no rust and all gears look very nice. I flushed the case out with diesel and started checking things starting with countershaft endplay. Hmmmmmm, .027, supposed to be 002 PRE LOAD!. So I remove the required shims to achieve the proper preload then check the lash on the input shaft gear. Supposed to be .005 - .012.....I have .027. SIGH. Dejected again, I call my brother, HD mechanic for 40 years and explain the issue stating "with the counter shaft out by .029 and now the input gear over double the allowable lash, am I wasting my time with this, is it just too wore out to mess with?". Brother says, "well first of all, you can't assume that all those tolerances are out due to wear. It is an old trans and for all you know Jed Clampet may have "rebuilt" It and not put it together properly. If all that end play on the countershaft was due to wear, the bearings would have piled up years ago. They just don't survive that kind of wear. If it turns smooth and the gears look good, with the countershaft now adjusted properly, run it, it will be fine. There is also a magnet in the oil trough that feeds the oil pump so I pulled that and it had a glob of goo on it but I squeezed all that goo between my fingers to see if I could feel any "pieces" and with the exception of one "something" about the size of a grain of sand, it was all the constancy of grease so just normal wear. So, I pulled the other trans and am in the process of getting the triplex in the chassis. The trans is ready, just have to "repair" the cross shaft for the release bearing (shows some wear) and powder coat the mounts. The plus to all this is that now I will be going back to the original mounts and clutch linkage so everything should drop right in and work as mack intended, just wish I known all this before buying that other trans and making mounts and clutch linkage. EXPERIENCE, something you get right after you needed it.
Last edited:
Boy is that ever one to put on the wall! Amazing build Cody! Same problem solving as with cars ... only bigger!EXPERIENCE, something you get right after you needed it.
Trans is all cleaned up inside and out and ready for install. The cross shaft for the release bearing had some wear on the "action" side, not a lot but there was some. Couldn't bear to put it back in that way, even though the side play was minimal so I turned that part of the shaft and made an interference fit sleeve to Bring it back to a true 1.25" all the way across. The bushings were still perfect.

Aint that the truth. EVERYTHING is brutally heavy...especially for an old fart like me. Naturally, the pressure plate for this trans is a different bolt pattern than the one on the engine so I had to change over the flywheel (which is close to 100 pounds). I had to make a pilot shaft to line up the disc but trying to put the clutch in was a chore. The pressure plate has GOT to be close to 100 pounds as well. Fortunately my son stopped in for a visit so he helped put the clutch in. Was still a job for 2 of us but we got it all together.Same problem solving as with cars ... only bigger!
Last edited:
