Duane took it to try on the headlight bucket so we could get a feel for what it would really look like.
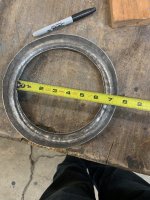
It is now 8 1/8 inside diameter, and 6 3/8 inside diameter, but to me it still looks a little "fat".
Have to see it on the car. Then make another just like it.


Making it smooth afterwards is the least of my worries. That's the easy part.
You can see now that the dolly can register right down to bottom out on the hammer form, the metal becomes much smoother as you're now hammering for the most part against the plywood.
Then just go round and round with many lighter blows tapping every 1/4 inch sideways and it becomes quite uniform.
You can run your finger around it and feel any highs or lows, and address that particular area with a few more even spaced blows.
It's not rocket science. Just consumes some of your precious time.
I'll add one more comment. I cut the middle out of the blank, cause I figured I was done at that point, and I could finish up better without the centre in place.
I was wrong. It became much harder to keep it down in the hammer form once I removed the centre.
Now that I have my "dolly" ground to what I think is the proper shape, ( unless we decide to put more crown into it), I will try to pretty much finish up before cutting the centre out of the blank.
It is now 8 1/8 inside diameter, and 6 3/8 inside diameter, but to me it still looks a little "fat".
Have to see it on the car. Then make another just like it.
Making it smooth afterwards is the least of my worries. That's the easy part.
You can see now that the dolly can register right down to bottom out on the hammer form, the metal becomes much smoother as you're now hammering for the most part against the plywood.
Then just go round and round with many lighter blows tapping every 1/4 inch sideways and it becomes quite uniform.
You can run your finger around it and feel any highs or lows, and address that particular area with a few more even spaced blows.
It's not rocket science. Just consumes some of your precious time.
I'll add one more comment. I cut the middle out of the blank, cause I figured I was done at that point, and I could finish up better without the centre in place.
I was wrong. It became much harder to keep it down in the hammer form once I removed the centre.
Now that I have my "dolly" ground to what I think is the proper shape, ( unless we decide to put more crown into it), I will try to pretty much finish up before cutting the centre out of the blank.